


YITAMOTOR® 2005-2011 Toyota Tacoma Sequential LED Headlights Assembly Parking Turn Signal Projector Headlamps

free shipping
on all orders
30 days
money back
lowest price
guarantee
safe shopping
guarantee
Description
Bi-functional LED DRL light bar, is not only used as a sleek LED daytime running lamp to raise the visibility and complete the car's look, but functions as a sequential turn signal to keep others informed of your intentions when you change lanes or make a turn.
Fitment
2005-2011 Toyota Tacoma Pickup Truck
Professional installation would be highly recommended
Features
- Stylish Design
The new lens and reflector bring superior lighting and ensure a pleasurable and comfortable driving experience.
- Tougher-Than-Nails Construction
Heavy-duty housings are made of superior OEM Grade ABS plastic to ensure exceptional resistance to weather and impact that guarantees durability for years ahead.
- Plug-n-Play Installation
As a fully compatible replacement for factory parts, our bolt-on style headlights are designed for quick and easy installation, requiring no modification or drilling.
- Guaranteed Quality
Our headlights are thoroughly tested to deliver smooth operation as well as for impact and heat resistance and endurance against rough road conditions over a long period of time. The units are completely sealed to prevent moisture from being trapped inside the housing.
Package Included
1 pair of headlights housing(including passenger & driver side)

California Residents: Prop 65 Warning
WARNING: Cancer and Reproductive Harm
Visit:www.p65warnings.ca.gov
Specifications
| Brand | YITAMOTOR |
| Material | ABS Plastic Housing / Polycarbonate Lens |
| Housing Color | Black |
| Lens Color | Clear |
| Reflector | Amber |
| Bulb Type | Halogen |
| High Beam Bulb Type | H7(Bulbs Included) |
| Low Beam Bulb Type | H7(Bulbs Included) |
| Corner Beam Bulbs Type | W5W(Bulbs Included) |
| HOLLANDER | 114-59473AL, 114-59472AR |
| PARTSLINK | TO2502181, TO2503181 |
| Replace Parts Number |
81150-04173, 81110-04173 |
| Package included | 1 Pair of Headlight Housing(Driver&Passenger Side) |
| Warranty | 1 Year |
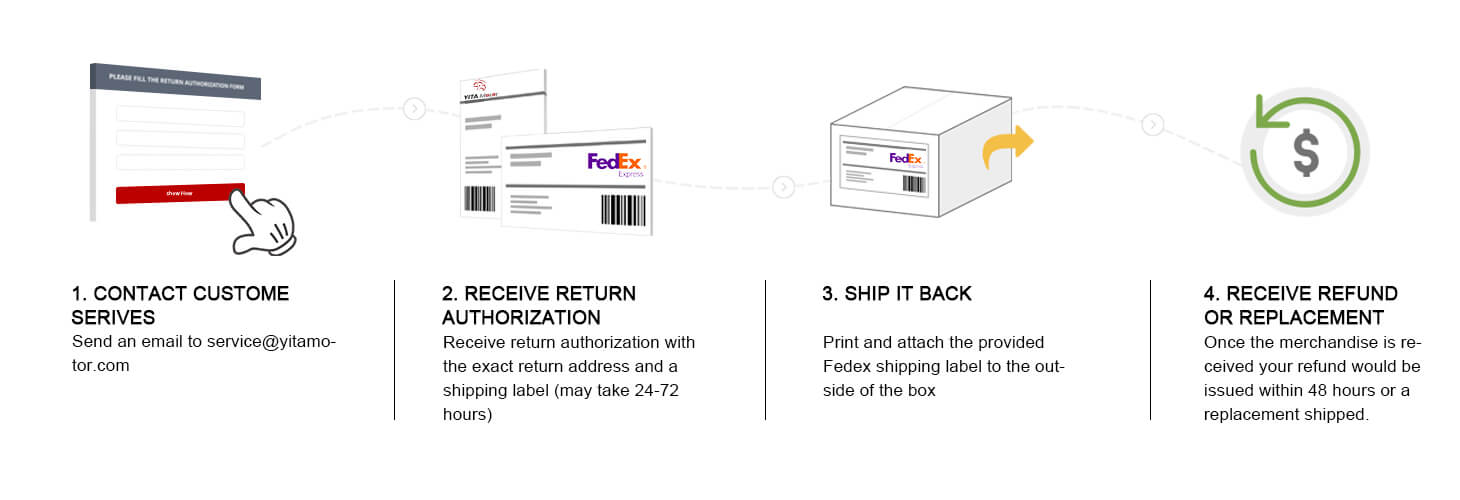
Easy Return
At YITAMOTOR, Your order means a lot to us, Feel free to contact us if you have any questions.
Not satisfied with it? We offer returns for products in new/unused condition within 30 days of delivery for a refund or exchange.
Returns or Exchanges items in 4 easy steps, and Appointment FedEx pickup service for you, hope you enjoy our safe and worry-free after-sales service.
Shipping
1. Item processing time
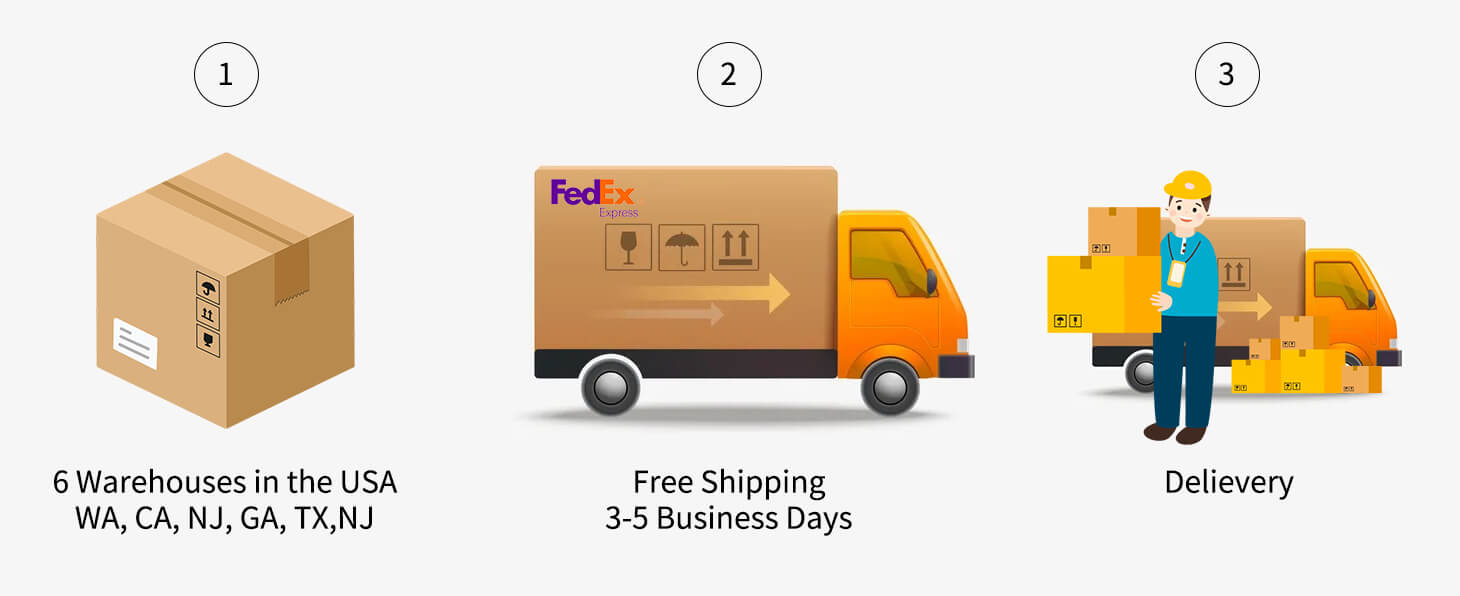
Note:
1. It may be delayed during holidays, such as Black Friday, Christmas, New Year, etc. Or under special weather conditions.
2. We will ship your item only by FEDEX, Please do not leave PO.BOX address.
Description
Bi-functional LED DRL light bar, is not only used as a sleek LED daytime running lamp to raise the visibility and complete the car's look, but functions as a sequential turn signal to keep others informed of your intentions when you change lanes or make a turn.
Fitment
2005-2011 Toyota Tacoma Pickup Truck
Professional installation would be highly recommended
Features
- Stylish Design
The new lens and reflector bring superior lighting and ensure a pleasurable and comfortable driving experience.
- Tougher-Than-Nails Construction
Heavy-duty housings are made of superior OEM Grade ABS plastic to ensure exceptional resistance to weather and impact that guarantees durability for years ahead.
- Plug-n-Play Installation
As a fully compatible replacement for factory parts, our bolt-on style headlights are designed for quick and easy installation, requiring no modification or drilling.
- Guaranteed Quality
Our headlights are thoroughly tested to deliver smooth operation as well as for impact and heat resistance and endurance against rough road conditions over a long period of time. The units are completely sealed to prevent moisture from being trapped inside the housing.
Package Included
1 pair of headlights housing(including passenger & driver side)
California Residents: Prop 65 Warning
WARNING: Cancer and Reproductive Harm
Visit:www.p65warnings.ca.gov
Specifications
| Brand | YITAMOTOR |
| Material | ABS Plastic Housing / Polycarbonate Lens |
| Housing Color | Black |
| Lens Color | Clear |
| Reflector | Amber |
| Bulb Type | Halogen |
| High Beam Bulb Type | H7(Bulbs Included) |
| Low Beam Bulb Type | H7(Bulbs Included) |
| Corner Beam Bulbs Type | W5W(Bulbs Included) |
| HOLLANDER | 114-59473AL, 114-59472AR |
| PARTSLINK | TO2502181, TO2503181 |
| Replace Parts Number |
81150-04173, 81110-04173 |
| Package included | 1 Pair of Headlight Housing(Driver&Passenger Side) |
| Warranty | 1 Year |
Easy Return
At YITAMOTOR, Your order means a lot to us, Feel free to contact us if you have any questions.
Not satisfied with it? We offer returns for products in new/unused condition within 30 days of delivery for a refund or exchange.
Returns or Exchanges items in 4 easy steps, and Appointment FedEx pickup service for you, hope you enjoy our safe and worry-free after-sales service.
Shipping
1. Item processing time
Note:
1. It may be delayed during holidays, such as Black Friday, Christmas, New Year, etc. Or under special weather conditions.
2. We will ship your item only by FEDEX, Please do not leave PO.BOX address.
-
Truly plug and play with the existing wire harness, or does anything need to be added or changed?
It's a plug-and-play Installation.
-
Do they come with lights
Yes. It's included the high/low beam and corner lights beam.
High/low beam bulb type: H7
Corner Beam bulb type: W5W -
Does it come with the passenger side and the driver side ?
Yes. The package included 1 Pair of Headlight Housing(Driver&Passenger Side).
-
What size bulb
High/low beam bulb type: H7(Bulbs included)
Corner Beam bulb type: W5W(Bulbs included)
-
Truly plug and play with the existing wire harness, or does anything need to be added or changed?
It's a plug-and-play Installation.
-
Do they come with lights
Yes. It's included the high/low beam and corner lights beam.
High/low beam bulb type: H7
Corner Beam bulb type: W5W -
Does it come with the passenger side and the driver side ?
Yes. The package included 1 Pair of Headlight Housing(Driver&Passenger Side).
-
What size bulb
High/low beam bulb type: H7(Bulbs included)
Corner Beam bulb type: W5W(Bulbs included)
